Anomaly Detection Using Apache Airflow
Introduction:
In this blog, we will discuss how to implement Outlier Detection using Airflow. Outlier detection is the process of detecting anomalies and subsequently excluding them from a given set of data. An outlier may be defined as a piece of data or observation that deviates drastically from the given norm or average of the data set. This solution process data, collected from the web servers, in a single data store. Collected data gets parsed and processed to generate the actionable insights.
Airflow Workflow:
Apache Airflowis an open-source tool for orchestrating complex computational workflows and data processing pipelines, a part ofdata engineering.If you find yourself running cron task that executes ever longer scripts, or keeping a calendar of big data processing batch jobs then Airflow can probably help you.
An Airflow workflow is designed as a directed acyclic graph (DAG). That means, that when authoring a workflow, you should think how it could be divided into tasks that can be executed independently. You can then merge these tasks into a logical whole by combining them into a graph.
Use airflow to author workflows as directed acyclic graphs (DAGs) of tasks. The airflow scheduler executes your tasks on an array of workers while following the specified dependencies. Rich command line utilities make performing complex surgeries on DAGs a snap. The rich user interface makes it easy to visualise pipelines running in production, monitor progress, and troubleshoot issues when needed.
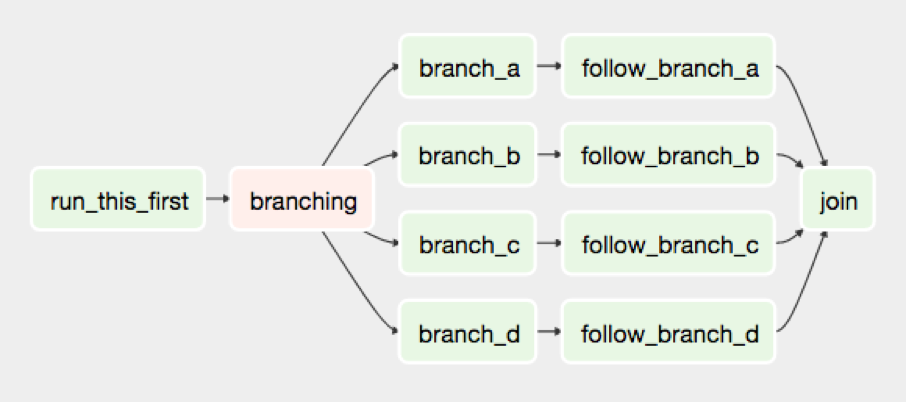
The shape of the graph decides the overall logic of your workflow.
An Airflow DAG can include multiple branches and you can decide which of them to follow and which to skip at the time of workflow execution.
Principles :
- Dynamic: Airflow pipelines are configuration as code (Python), allowing for dynamic pipeline generation. This allows for writing code that instantiates pipelines dynamically.
- Extensible: Easily define your own operators, executors and extend the library so that it fits the level of abstraction that suits your environment.
- Elegant: Airflow pipelines are lean and explicit. Parameterizing your scripts is built into the core of Airflow using the powerful Jinjatemplating engine.
- Scalable: Airflow has a modular architecture and uses a message queue to orchestrate an arbitrary number of workers. Airflow is ready to scale to infinity.
Prerequisites:
Airflow is written in Python, so to follow this tutorial, you will require python installed.
Installation of Apache Airflow:
Let’s create a workspace directory for this tutorial, and inside it a Python 3 virtualenv directory:
- $ cd path to my airflow working directory
- $ virtualenv -p `which python3` venv
- $ source venv/bin/activate
- (venv) $
The easiest way to install the latest stable version of Airflow is with pip:
- pip install apache-airflow
You can also install Airflow with support for extra features like s3 or postgres:
- pip3 install “apache-airflow[s3, postgres]”
GPL dependency
One of the dependencies of Apache Airflow by default pulls in a GPL library (‘unidecode’). In case this is a concern you can force a non GPL library by issuing export SLUGIFY_USES_TEXT_UNIDECODE=yesand then proceed with the normal installation. Please note that this needs to be specified at every upgrade. Also note that if unidecode is already present on the system the dependency will still be used.
Now we’ll need to create the AIRFLOW_HOME directory where your DAG definition files and Airflow plugins will be stored. Once the directory is created, set the AIRFLOW_HOME environment variable:
- (venv) $ cd path to my airflow working directory
- (venv) $ mkdir airflow_home
- (venv) $ export AIRFLOW_HOME=`pwd`/airflow_home
You should now be able to run Airflow commands. Let’s try by issuing the following:
- (venv) $ airflow version
If the airflow version command worked, then Airflow also created its default configuration file airflow.cfgin AIRFLOW_HOME.
On executing the “tree” command we will find out :
airflow_home
├── airflow.cfg
└── unittests.cfg
Initialize the Airflow DB
Next step is to issue the following command, which will create and initialise the Airflow SQLite database:
- airflow initdb
The database will be created.
airflow_home
├── airflow.cfg
├── airflow.db <- Airflow SQLite DB
└── unittests.cfg
Using SQLite is an adequate solution for local testing and development, but it does not support concurrent access. In a production environment, you will most certainly want to use a more robust database solution such as Postgres or MySQL.
airflow initdbwill create all default connections, charts, etc that we might not use and don’t want in our production database. airflow upgradedb will instead just apply any missing migrations to the database table. (including creating missing tables etc.) It is also safe to run every time, it tracks which migrations have already been applied (using the Alembic module).
Start the Airflow web server
Airflow’s UI is provided in the form of a Flask web application. You can start it by issuing the command:
- airflow webserver
You can now visit the Airflow UI by navigating your browser to port 8080 on the host where Airflow was started, for example:http://localhost:8080/admin/
Note: the default port is 8080, which conflicts with Spark Web UI, hence at least one of the two default settings should be modified.
This command will allow you to start the Airflow web server in a different port. (say 8081)
- airflow webserver -p 8081
Your first Airflow DAG :
OK, if everything is ready, let’s start writing some code. We’ll start by creating a sample workflow.
Create your dags_folder, that is the directory where your DAG definition files will be stored in AIRFLOW_HOME/dags. Inside that directory create a file named program.py.
airflow_home
├── airflow.cfg
├── airflow.db
├── dags <- Your DAGs directory
│ └── program.py <- Your DAG definition file
└── unittests.cfg
Add the following code to dags/program.py:
from datetime import date timefrom airflow import DAG
from airflow.operators.python_operator import PythonOperator
import pandas as pd
def model():
“”” This function will prepare the model to detect anomaly in the given data.
This model calculates the Standard Score on the Usage metric “””
data = pd.read_csv(“airflow_home/data/sampleData.csv”, sep=’,’, names=[“Id”, “Timestamp”, “Usage”])
data_df = pd.DataFrame()
grouped_df = data.groupby([‘Id’])[“Timestamp”].unique()
for key, value in grouped_df.items():
sub_df = (data.loc[data[“Id”]] == key)
mean = sub_df[“Usage”].mean()
stndrd_deviation = sub_df[“Usage”].std()
sub_df[“z_score”] = (sub_df[“Usage”] – mean) / stndrd_deviation
data_df = data_df.append(sub_df, ignore_index=True)
data_df.to_csv(“airflow_home/data/model.csv”, sep=’,’, index=False)
def label(row, col1, col2, standard_score):
“”” This function will label each entry as an Outlier or as Not Outlier.
This labeling is based on a predetermined Standard Score “””
standard_score = int(standard_score)
if row[col1] >= standard_score or row[col1] <= -standard_score :
row[col2] = ‘Outlier’
else:
row[col2] = ‘Not Outlier’
return row
def outlier_tagging():
“”” This function tags each ow of the data by calling the label() function “””
data = pd.read_csv(“airflow_home/data/model.csv”, sep=’,’, names=[“Id”, “Timestamp”, “Usage”, “z_score”])
labelled_data = data.apply(lambda x: label(x, ‘z_score’, ‘Indicator’, 2.5), axis=1)
labelled_data.to_csv(“airflow_home/data/labelled_data.csv”, sep=’,’, index=False)
def outlier_omission():
“”” This function will ommit all the outliers from the data “””
data = pd.read_csv(“airflow_home/data/labelled_data.csv”, sep=’,’, names=[“Id”, “Timestamp”, “Usage”, “z_score”, “Indicator”])
cleaned_data = data[data[“Indicator”] != ‘Outlier’]
cleaned_data.to_csv(“airflow_home/data/cleaned_data.csv”, sep=’,’, index=True)
dag = DAG(‘Outlier’, description=’SampleDAG’, schedule_interval=’0 12 * * *’, start_date=datetime(2020, 1, 1), catchup=False)
model_building_operator = PythonOperator(task_id=’zscore_task’, python_callable=model, dag=dag)
outlier_tagging_operator = PythonOperator(task_id=’tag_outliers’, python_callable=outlier_tagging, dag=dag)
outlier_omission_operator = PythonOperator(task_id=’ommit_outliers_from_data’, python_callable=outlier_omission, dag=dag)
model_building_operator >> outlier_tagging_operator >> outlier_omission_operator
Running your DAG
In order to run your DAG, start the Airflow scheduler by issuing the following commands:
- cd path to my airflow working directory
- export AIRFLOW_HOME=`pwd`/airflow_home
- source venv/bin/activate
- (venv) $ airflow scheduler
This command will schedule your task. Now go to the Airflow Webserver (UI). There you will find the DAG ‘Outlier’ is listed along with sample other dags.
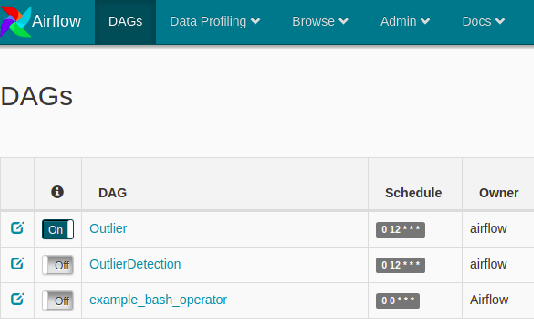
The Airflow Webserver
Click on the “On” button & then the Run Button . This will start executing the Tasks of the DAG. Then on clicking in the Graph View Button, we will get to see the following screen where all tasks will be scheduled in the predefined order.
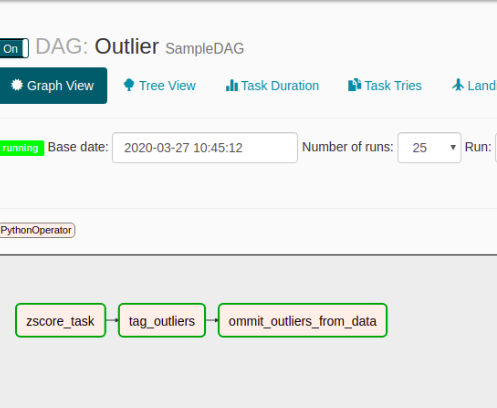
Graph View of our DAG
Now on clicking any particular task a pop up window will turn up. Now click on the “View log” option to find the output of each task. Now as per code the task can be scheduled per day and one can detect outliers from the input data and carry out the necessary steps as required.
In this approach we have used Z Score to find the outliers from the data. One can use any other approach as per business requirements.


